Building Instructions
Step by step to your self-made LED robot!

Parts Included
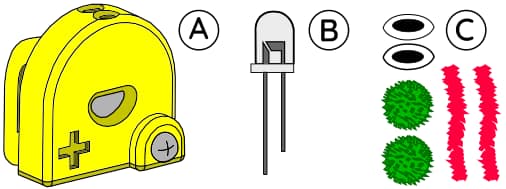
A. 3D printed connector system with
with screwed in Battery
B. LED color changing
C. Googly eyes and decoration
Preparation
Open your packaging and take out all components. Save the plastic bag if you want to store your robot in it. To attach the motor cables and decorations you will need glue, preferably a hot glue gun or liquid glue.

1. LED installieren
At the top of the connector system you will find two small holes intended for the LED. Carefully push the LED into the two holes using the metal legs. Please note the direction of insertion. A small plus symbol can be seen on the front of the case. The longer of the two legs of the LED is pushed into the front hole, the shorter one into the back hole.
Turning the robot on and off: Slide the LED out a little to turn the light on and back in to turn it off.

2. Decorate your robot
Finally, your robot can be decorated according to your imagination. The included decoration can be attached with your glue. Attention, googly eyes are not self-adhesive and are also attached with your glue. Have fun experimenting further!
To replace the battery, you will need a small screwdriver. This allows you to loosen the screw connection and reattach it. Note the positive pole when inserting the new battery; it points forward.
If you have any questions about the building instructions, please let us know, we can help you!

On the back of the LED robot, a clip has been 3D printed on the housing for attachment to, for example, clothing or a backpack, etc.
You can find ideas for further experimentation with your finished robot here: Experiment ideas

Folgende Tipps helfen bei der Fehlersuche wenn der Roboter nicht funktioniert: Troubleshooting
You can find suggestions and inspiration on how to decorate your robot here: Decovariations
You can find ideas for further experimentation with your finished robot here: Experiment ideas
Erklärung Clip Funktion
