Building Instructions
Schritt für Schritt zu deinem selbstgebauten LED-Roboter!

Parts Included
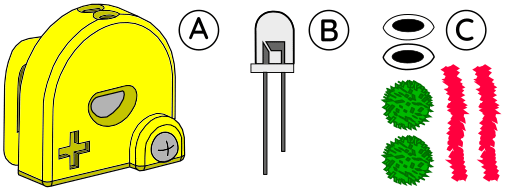
A. 3D-Druck-Stecksystem mit
verschraubter Münzbatterie
B. Leuchtdiode farbwechselnd
C. Wackelaugen und Deko
Preparation
Öffne deine Verpackung und nimm alle Bauteile heraus. Hebe dir das Plastik-Beutelchen auf, wenn du darin deinen Roboter aufbewahren möchtest. Für die Befestigung der Dekoration benötigst du Klebstoff, am Besten eine Heißklebepistole oder flüssigen Kleber.

1. LED installieren
Am oberen Kopfende des Stecksystems findest du zwei kleine Löcher, die für die LED vorgesehen sind. Schiebe die LED vorsichtig mit den Metallbeinchen in die beiden Löcher. Beachte die Steckrichtung dabei. Auf dem Gehäuse ist vorne ein kleine Plus-Symbol zu sehen. Das längere der beiden Beinchen der LED wird in das vordere Loch geschoben, das kürzere in das hintere Loch.
An- und Ausschalten des Roboters: Schiebe die LED ein wenig heraus, um das Licht einzuschalten und wieder hinein, um es auszuschalten.

2. Dekoriere deinen Roboter
Nun kann dein Roboter ganz nach deiner Fantasie dekoriert werden. Die mitgelieferte Dekoration kann mit deinem Kleber befestigt werden. Achtung, Wackelaugen sind nicht selbstklebend und werden ebenfalls mit deinem Kleber befestigt. Viel Spaß beim weiteren Experimentieren!
Zum Austauschen der Batterie benötigst du einen kleinen Schraubendreher für Kreuzschlitzschrauben. Damit kannst du die Verschraubung lösen und wieder befestigen. Beachte den Plus-Pol beim einsetzen der neuen Batterie, es zeigt nach vorne.
Falls du noch Fragen zur Bauanleitung hast, lass es uns wissen, wir können dir weiterhelfen!

Ideen zum weiteren Experimentieren mit deinem fertigen Roboter und Erklärungen zu den Funktionen findest du hier: Experiment ideas
Folgende Tipps helfen bei der Fehlersuche wenn der Roboter nicht funktioniert: Troubleshooting
You can find suggestions and inspiration on how to decorate your robot here: Decovariations
You can find ideas for further experimentation with your finished robot here: Experiment ideas
Erklärung Clip Funktion

